Lifestyle
How Do I Make a Balloon Arch – Can You Provide Step-by-Step Instructions?
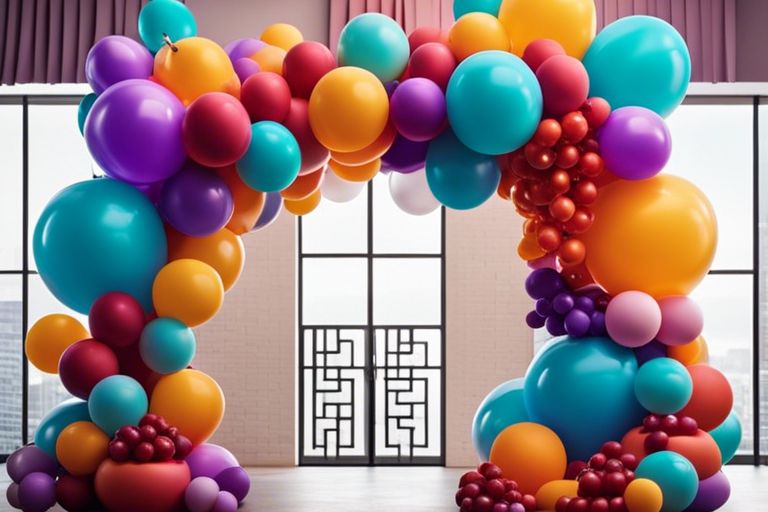
Greetings, fellow balloon enthusiasts! Are you looking to make a statement at your next event with a stunning balloon arch? You’ve come to the right place. I’ve created countless balloon arches over the years and can assure you that it’s a manageable and rewarding project. In this blog post, I will provide you with step-by-step instructions on how to create a beautiful balloon arch that will surely impress your guests. From selecting the right materials to assembling the arch and adding finishing touches, I will guide you through the entire process. Let’s get started!
Key Takeaways:
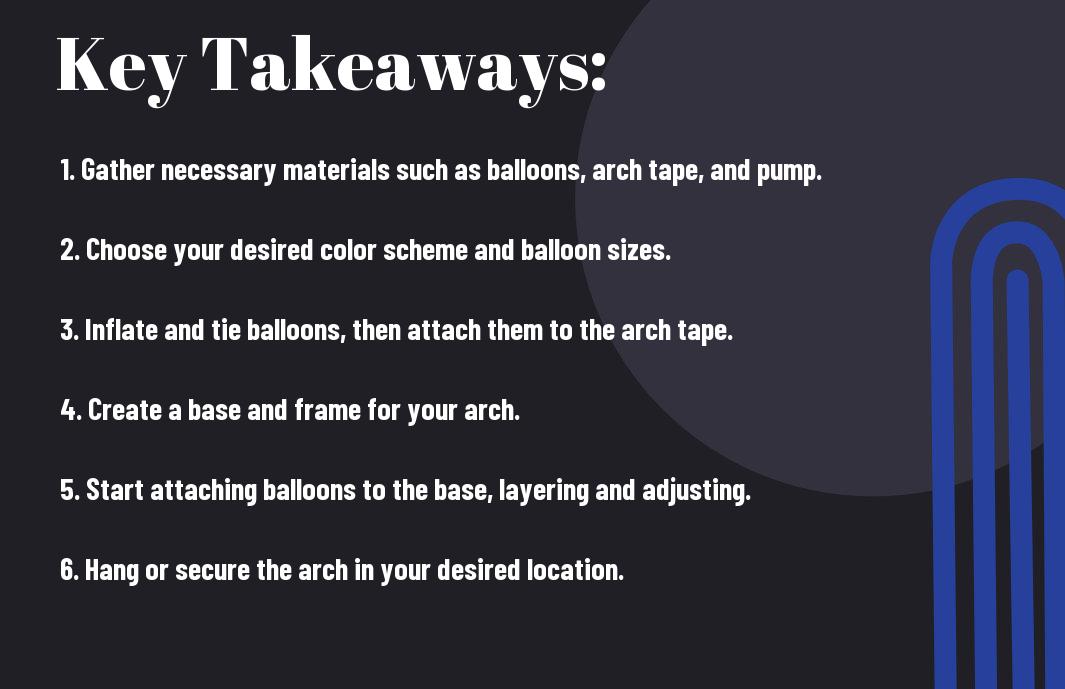
- Materials and Tools: Gather all of the necessary materials and tools including balloons, fishing line, a strong adhesive, and a balloon pump.
- Measure and Plan: Measure the area where the arch will be displayed and plan the size and shape of the arch accordingly.
- Create the Base: Use a sturdy base such as a PVC pipe or wire frame to create the foundation of the arch.
- Inflate and Attach Balloons: Inflate the balloons to the desired size and attach them to the base using fishing line or a strong adhesive.
- Add Finishing Touches: Once all of the balloons are attached, add any necessary finishing touches such as ribbons or additional decorations to complete the balloon arch.
Materials Needed for Making a Balloon Arch
To make a balloon arch, you will need a few essential materials. These materials include balloons, fishing line, a balloon pump, and an arch frame. For detailed step-by-step instructions on making a balloon arch, you can also check out this guide on How to Make a Balloon Arch Balloon Garland The Ultimate Guide.
Balloons
When creating a balloon arch, the most important material you will need is, of course, balloons. You can use any color or size of balloons, depending on the theme or color scheme of your event. It’s important to have a good mix of sizes to create visual interest. I recommend using a combination of standard latex balloons and decorative foil balloons for a striking look.
Fishing Line
Another essential material for making a balloon arch is fishing line. This will be used to string the balloons together and create the arch shape. Make sure to have enough fishing line to accommodate the length of your arch. The fishing line should be strong and durable to support the weight of the balloons.
Balloon Pump
Using a balloon pump is a great way to save time and energy when inflating the balloons for your arch. It allows for quick and easy inflation, ensuring that all your balloons are uniform in size. This is especially important for creating a visually appealing balloon arch.
Arch Frame
Finally, you will need an arch frame to provide structure and support for your balloon arch. This can be purchased as a pre-made kit or created using PVC piping. The arch frame will help give your balloon arch its distinctive shape and ensure that it stays upright during your event.
Step-by-Step Instructions for Making a Balloon Arch
Assuming you have all the materials at hand, making a balloon arch can be a fun and rewarding project. Here, I will provide you with step-by-step instructions on how to create a beautiful balloon arch for your next event or party. Let’s get started!
Inflating the Balloons
First, you will need to inflate the balloons. You can use a hand pump or a helium tank to inflate the balloons. Be sure to inflate the balloons to the desired size, keeping in mind that you will need a variety of sizes to create a visually appealing arch.
Tying the Balloons Together
Once the balloons are inflated, tie them together in pairs. This will make it easier to work with them when constructing the arch. I find it helpful to use a double knot to ensure the balloons stay secured together.
Attaching the Balloons to the Arch Frame
With the balloons paired and tied together, it’s time to attach them to the arch frame. You can use a pre-made arch frame or create your own using PVC pipe. Simply attach the balloon pairs to the frame using zip ties or string, spacing them out evenly to create a uniform look.
Shaping the Arch
Once all the balloons are attached to the frame, it’s time to shape the arch. Start at one end of the frame and work your way to the other end, adjusting the balloons as needed to create a smooth, flowing arch. Don’t be afraid to make small tweaks to ensure the arch looks just right.
Decorating the Balloon Arch
Now that you’ve successfully constructed your balloon arch, it’s time to add some decorative elements to make it really pop. Whether it’s for a birthday party, wedding, or other special event, decorating your balloon arch will take it to the next level and impress your guests.
Adding Ribbons and Streamers
When it comes to adding ribbons and streamers to your balloon arch, you want to ensure that they complement the colors of your balloons. I like to use a variety of different textures and widths to create an eye-catching look. You can simply tie them onto the balloon knots or tape them to the arch at different points. Remember to secure them well to prevent them from coming loose and causing a potential hazard.
Incorporating Confetti Balloons
If you want to add an extra element of fun to your balloon arch, consider incorporating confetti balloons. These balloons are filled with colorful confetti and can be scattered throughout the arch to add a playful touch. When using confetti balloons, I recommend inflating them with a mixture of helium and air to ensure they float but are not too delicate. Be cautious when using confetti balloons as the tiny pieces of paper can be a choking hazard for young children and pets. Always supervise their use and clean up any popped balloons immediately.
Conclusion
Upon reflecting on the process of creating a balloon arch, I am confident in my ability to provide step-by-step instructions to guide you through the creation process. By following my detailed instructions, you will be able to create a stunning balloon arch for any event or occasion. Remember to consider the color scheme and theme of your event when selecting your balloon colors, and be sure to measure and plan out the placement of your balloons to ensure a balanced and visually appealing design. With some patience and creativity, you can easily make a beautiful balloon arch that will impress your guests and elevate the décor of your event.
FAQ
Q: What materials do I need to make a balloon arch?
A: To make a balloon arch, you will need an assortment of balloons in your desired colors, a balloon arch kit (or PVC pipe and connectors if making a DIY kit), a helium tank (optional), fishing line or balloon decorating strip, and a handheld balloon pump.
Q: Can you provide step-by-step instructions for making a balloon arch?
A: Certainly! Step 1: Determine the size and shape of your arch. Step 2: Inflate and tie the balloons. Step 3: Attach the balloons to the balloon decorating strip or fishing line. Step 4: Assemble the arch according to the kit’s instructions or bend the PVC pipe to form the desired shape. Step 5: Spread out and adjust the balloons to cover any gaps.
Q: How long will it take to make a balloon arch?
A: The time needed to make a balloon arch can vary depending on its size and complexity. A simple arch can be assembled in about 1-2 hours, while larger or more intricate designs may take several hours to complete.
Q: How far in advance can I make a balloon arch before an event?
A: Balloon arches can typically be made up to 24-48 hours in advance of an event, especially if using helium to inflate the balloons. However, it’s best to inflate and assemble the arch as close to the event time as possible to ensure the balloons stay inflated and the arch looks its best.
Q: How long will a balloon arch last?
A: The lifespan of a balloon arch can vary depending on factors such as temperature, humidity, and the quality of the balloons and helium used. Under optimal conditions, a well-made balloon arch should last for 1-2 days before the balloons start to deflate and lose their shape.
-
 Entertainment2 years ago
Does The Rock Have a Twin Brother? Exploring Celebrity Family Facts
-
 Lifestyle2 years ago
How Long Does a Killer Whale Live – What's Their Average Lifespan?
-
 Lifestyle2 years ago
How Many Hairs Are on a Human Head? Understanding Hair Density
-
 Lifestyle2 years ago
What Is an Industrial Plant? Exploring Industrial Facilities
-
 Technology2 years ago
How Far Can a Human Eye See – What's the Maximum Range?
-
 Lifestyle2 years ago
North Carolina Education Lottery App – Playing Lottery Games on Mobile
-
 Technology2 years ago
How Many People Can Solve a Rubik's Cube – Is It a Common Skill?
-
 Technology2 years ago
Is Dr. Pepper a Coke Product – Who Manufactures It?